How to Install Rollo Printer on Windows and Mac?
Want to know how to install Rollo printer on your desktop? No worries—I’ve got you covered! In this guide, you will learn how to set up the printer properly.
I started my journey with a Rollo label printer when I set up my first online business. Whenever I prepared orders for my customers, I had to attach invoice labels to the packaging. It was really time-saving and helped me provide essential information about the product, such as the price and other details. But before we start using the printer, we need to install it on Windows and Mac.
Make sure you have your computer and printer ready. All you need to do is do the basic setup, like turning on the desktop and the printer. Once you have done this, I will start installing the printer on Windows 10 and Mac. Let’s get started!
Install Rollo Printer on a Windows Computer
On a Windows computer, I will first install the driver software and then walk you through the steps to set up your printer. So, you will start with the installation and end with the setup.
Here’s how to install and set up the printer:
- In order to install Rollo printer Windows 10, you need to download Rollo printer driver (latest
version).
- To download the driver software, visit www.rollo.com.
- Afterward, the downloaded file will be
loaded to the Downloads folder,
which is usually set by default. However, the downloaded file name will be
“Rollo-Windows-Latest.”
- Once the zip file is downloaded
to the PC, extract the file and follow the further steps.
- Once installation is done, open
your Settings and navigate to
the Control Panel.
- Then, head to Devices and Printers to reach
Windows Printers.

- Now, find “Rollo Printer.” Right-click on it.
- Next, you need to click on Printing Preferences.
- Also, you have to click on Advanced from the layout tab.

- Lastly, select the label size from the drop-down menu. Save settings by hitting the OK button.
Install Rollo Printer on Your MacBook
The below steps are for the Rollo label printer only. You first need to install the driver, and then you will have to set it up. To learn, follow the steps given below for Mac computers:
- Visit www.rollo.com and download the printer’s Mac driver.
- When you open the download file, you should
see the screen given below.
- After that, double-click on the pkg
installer to start the installation.
- Follow the steps to install the driver until
the “Installation was successful” message
appears on the screen.

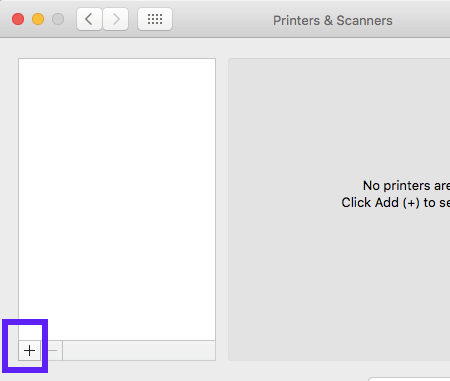
- Head to the Mac’s “Settings” and select “Printers and Scanners.”
- On the next screen, you have to
press the ‘+’ icon.
- Now, click on the Rollo Thermal Printer and choose “Select Software” from the
drop-down menu.
- Then, search for “Rollo Printer” and select OK.
- On the following screen, click on
“Add”.
- You notice the green light next to the Rollo Thermal Printer. After this, you will be all set.
How to Setup Rollo Printer: Simple and Easy Steps
First, install Rollo printer and then start setting it up. Below, I’ll be sharing a few steps that will help you set up your printer. Follow the steps that are mentioned below to set up your printer:
- Ensure your printer’s power switch is off
(located in the back of the printer).
- Next, you need to connect the power cable to
your printer and to the wall outlet.
- After that, you have to connect the USB
cable to your printer and the computer.
- Now, open the top and place the labels on
the printer.
- Then, adjust the tabs as needed and close
the top.
- In the last step, turn the power switch on.
Now, we’ll do automatic label identification so that the printer can learn the label. However, you will need to do this only once unless you change the label types and size. To do automatic label identification, follow the steps below:
- Press the power button until you hear one beep.
- After that, wait for some time.
- Finally, your printer is ready to identify your label automatically.
Finally, you have learned to install Rollo printer and set it up on your desktops. Let’s start with your printer right away, hassle-free.
FAQs
Question 1: How to print on Rollo printer after
setup?
Answer: Make sure your devices are connected to the same Wi-Fi network. In order to print from your printer on Windows/Mac, you have to walk through the following steps:
- On Mac, visit Settings, then click on Printers
> + to add a printer.
- Then, you have to choose the Rollo X1040 printer.
Question 2: How to do label setup?
Answer: Follow the steps below to set up the label:
- Press the side release button to open the
top cover and remove the labels from inside.
- After that, adjust the purpose guide to
match the width of the new label.
- And then close the top cover now.
- Feed the new labels and peel them off should
face up.
- Finally, your printer will learn your new labels.
Question 3: Why is my Rollo printer not
printing anything?
Answer: If you are using a wireless printer, please check if
there is interference between your printer and router. Obstructions can lead to
printing failure and can delay your printing task. Hence, you need to power off
the printer, wait for 20 seconds, and then turn it back on. Once done, you need
to see whether the Wi-Fi light is blue. Now, print a label to test.
Read more: www.rollo.com/support
rollo
printer driver mac
rollo
printer driver windows
how to setup rollo
printer


Comments
Post a Comment